
Last updated: September 2026
Contents
- Preface
- Before You Start
- Your First Shopping List
- Section 1: The Basic Home Range (Keep It Simple)
- Section 2: Range Safety
- Section 3: Refining the Basic Home Range
- Section 4: Filling Your Cylinder at Home
- Appendix: Upgrades to Consider
- Cost Summary
- Help Us Keep This Guide Current
- Disclaimer
- References
Preface
When I turned to air pistol shooting in early 2020, I found myself in a situation where I could not train, as there was no air range anywhere in my vicinity, so I had no choice but to look into building one at home. Plenty of people have written about the subject over the years, but most of what I found online was stale or incomplete, with pages missing or links broken. I had to piece things together from fragments: forum discussions, conversations with other shooters, and photos of other people's ranges. From there I experimented and sorted out for myself what actually worked. My biggest challenge was getting the lighting right, and getting a dingy basement up to official standards took me several tries. In the end, I had something worth sharing.
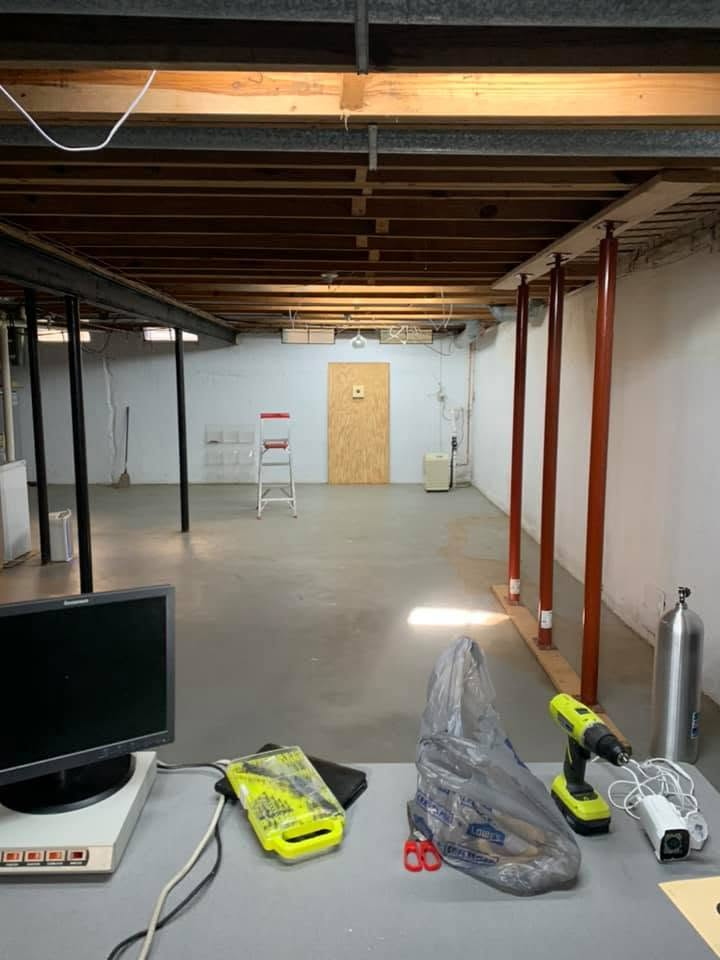
My basement range while it was being built, seen from the firing point.
I shared the journey in a Facebook group dedicated to ISSF shooting at the time, and the response was excellent: a lot of encouragement, and a lot of shooters who took what I had learned and built ranges of their own. After starting Sport Shooting Depot, I often found myself sharing this experience again and again with new and experienced shooters looking to build their first home range or improve the one they already have. This guide gathers all of those conversations, posts, and first-hand experience into something coherent, and hopefully useful, for any shooter, new or not so new, who wants to build an airgun range at home: what the options are, and what to consider along the way.
Who sets the rules: The 10 m air rifle and air pistol events are governed worldwide by the ISSF (International Shooting Sport Federation), which writes the rules for Olympic shooting. In the US, the bodies that run airgun competitions all align their rules with ISSF: USA Shooting, the national governing body for Olympic shooting; the CMP (Civilian Marksmanship Program), which runs national air rifle and air pistol programs and matches; and the NRA (National Rifle Association), which sanctions competitions and publishes the official targets used at US matches. From here on, this guide refers to ISSF, and notes any place where a US rule differs.
What this guide covers: Building the range itself. Choosing your gun, selecting equipment, and training and coaching are subjects of their own and are not covered here. For getting started in the sport, see our guide to entering ISSF competition in the US [LINK PLACEHOLDER: public URL for the ISSF competition guide, once published], which covers the competitive landscape.
What this range is built for: This guide is strictly for low-powered competition airguns, the 10 m ISSF air rifle and air pistol disciplines, the same Olympic-style events contested at the Games, firing 4.5 mm (.177 caliber) pellets at match velocities. It is absolutely not for firearms of any kind, or for any live ammunition in .22 or any other caliber. A setup like this could potentially be adapted for higher-powered airguns, but that is outside what is described here.
How to use this guide: Work through it in order and you will end up with a 10 m lane you can train on seriously, built on a modest budget, with a clear path to upgrade it once you start aiming for higher goals and your current setup begins to hold back how effectively you can practice. If you are just starting out, Before You Start, the shopping list, and Sections 1 and 2 are all you need for a working range. Sections 3 and 4 make it better, and the appendix is for later, once you are shooting regularly. Each section opens with a one-line summary, so you can skip what you do not need yet.
Before You Start
Settle the essentials before you spend a dollar: whether you can shoot where you live, whether your space works, and what it will cost.
Check the Rules Where You Live
Renters should check the lease; condo and apartment owners, the association rules. State and local rules on using and storing airguns indoors vary more than most people expect, so check those too. If you share a wall with a neighbor, keep in mind that the sound of pellets hitting the catcher carries (see Noise Mitigation in Section 3).
Check the Space
Confirm your space is adequate to fit the range.
- Where to put it: This guide talks about basements a lot, because that is where most home ranges end up, but a garage or a long hallway can work just as well. Adjust the advice to your space.
- Distance: You need 10 m (33 ft) from the target face to the firing line, plus some room behind the line to move around and stand comfortably. Plan on 12 m (about 40 ft) or more in total. If your space falls short, see Short on space? under Marking the Firing Line in Section 1.
- Width and headroom: You need enough width to settle into your stance and turn toward the target, and clear headroom at the firing point. In a basement, watch for pipes, ducts, and low joists that get in the way when you raise the gun.
- What is behind the target wall: Look at what is directly behind and around the wall you plan to shoot toward. A match airgun can go through a layer of drywall, though it typically will not make it through both sides of a standard interior wall, and it can break a window. That is why the range needs a backstop behind the trap (Section 1). Plywood is the usual choice; a heavy tarp or even a ballistic curtain hung along the wall also works. Avoid spots with windows, doors, walkways, or occupied rooms in the line of fire. If a door cannot be avoided, lock it while you shoot.
What It Costs
A basic setup typically runs $50 to $150, depending on what you already have or can upcycle. Anything beyond the basic setup adds to that. The shopping list below covers the basics, and a full cost breakdown is at the end of this guide.
Climate
Basements are the most common spot for a home range, and usually the dampest. Keep humidity under control, since it affects stored pellets and anything metal in the room. A dehumidifier is usually enough. If you plan to shoot year round, think about heat and airflow as well. A cold, unfinished basement gets used a lot less than a comfortable one.
About the Rules
This guide is for a private, beginner-friendly home range, so the ISSF figures in it are guidelines, not requirements. Follow them as closely as you like. We checked everything against the current ISSF Rule Book, but the rules can and do change between editions. If you want your range to match the regulations exactly, cross-reference the latest edition of the rulebook rather than relying solely on the numbers in this guide.
Your First Shopping List
Everything a basic range needs in one list, split into what you have to buy and what you probably already have. Section 1 explains how it all fits together.
Must buy:
- Official target cards for your discipline: about $7 to $10 per 100. In the US, that is the NRA B-40 for air pistol or the AR-5/10 for air rifle, both ISSF-compliant.
Strongly recommended:
- Target holder with pellet catcher: about $20 to $30. Holds the target card in front of a steel trap that stops and collects the pellets. Section 1 covers homemade alternatives, but this is what we recommend. Check that the holder fits your card size and, for air rifle, that it is rated for rifle and not just pistol.
You may already have these, or can upcycle them:
- Plywood for the backstop: a piece of 3/4 inch (18 mm) plywood about 3 feet (90 cm) wide or wider. A leftover sheet works.
- Lighting: depends on your space. You will most likely need a spotlight aimed at the target; how much general lighting to add depends on what the room already has (Section 3 has the numbers).
- Floor tape and a tape measure to mark the firing line.
- A stand or table at the firing line: an offhand stand for rifle, or anything sturdy at around waist height for pistol.
For safe shooting and cleanup:
- Something to keep the line of fire clear: barrier tape, a rope, a pet gate, or whatever works in your space, so that no one, person or pet, can walk between you and the target while you are concentrating on a shot.
- Damp paper towels or lead-removal wipes, and a sealed container for spent pellets.
Section 1: The Basic Home Range (Keep It Simple)
By the end of this section you will have a target that safely stops every pellet, set at the right height on a solid backstop, with a firing line 10 m away to stand behind.
The Target Unit (Target Holder with Pellet Catcher)
Every shot needs something behind the target to stop the pellet, and there are several ways to set that up. Some shooters pin the target to a block of foam. Others pin or clip it to a cardboard box filled with rags, rubber mulch, or another material that stops pellets and dampens the sound. What we recommend is a metal target holder with an integrated pellet catcher, which holds the target card in front of a steel trap that stops and collects the pellets. Whatever you use, never shoot at a target on a bare wall.
Use official target cards for your discipline, so your practice scores mean the same thing as match scores. In the US, the paper targets available are the NRA 10 m targets, and they meet ISSF requirements:
- Air pistol, B-40: a single bullseye on a card about 7 x 8 inches, with a black 2 3/8 inches across.
- Air rifle, AR-5/10: 12 small bullseyes on a card about 12 x 10.5 inches, each black 1 3/16 inches across.
Make sure your holder fits your card, since the rifle card is much larger than the pistol card. Rifle shooters should also check that the catcher is rated for air rifle, since some inexpensive traps are made for pistol only. The holder also needs to be mounted on something solid, and a sheet of plywood is a good solution.
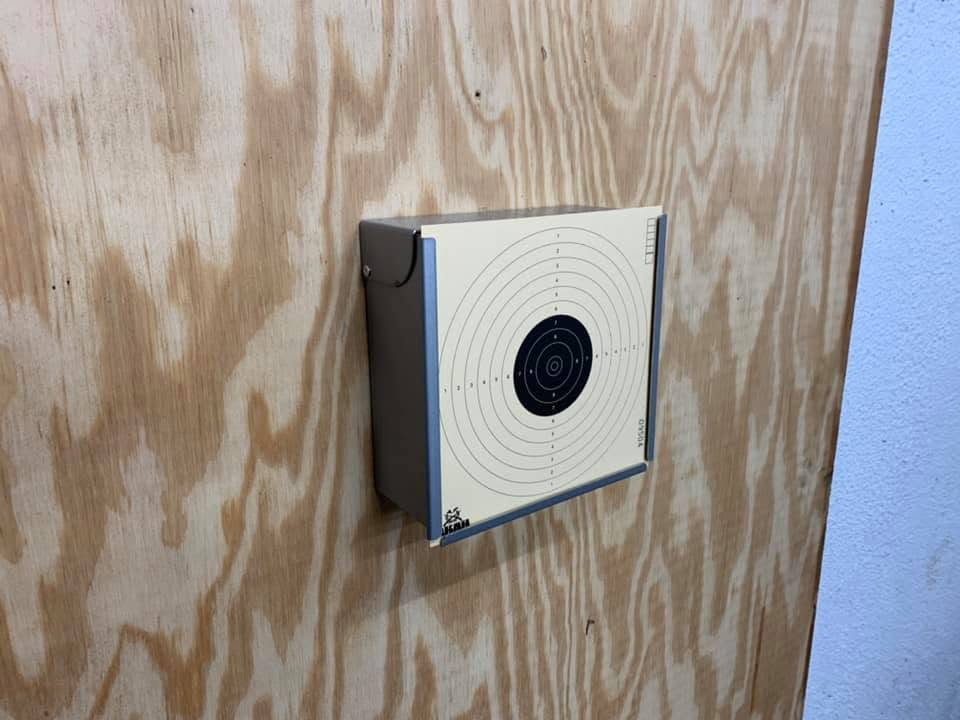
The target holder with an air pistol target in place, mounted on the plywood backstop.
Backstop and Wall Protection
Mount the holder on a sheet of 3/4 inch (18 mm) plywood, about 3 feet (90 cm) wide or wider. ACX or CDX, two common plywood grades sold at any home improvement store, both hold up well without much splintering. Thinner 1/2 inch plywood can crack or splinter, and over time pellets can work their way through it. The board does two jobs: it gives the holder something solid to mount on, and it catches the occasional stray that misses the catcher, so that shot stays out of your wall. Replace it if strays ever wear through it.
Setting up the board: The simplest option, and the one used for the range in this guide, is to stand the plywood on the floor and lean it against the wall at a slight angle, with nothing to drill; just make sure the bottom cannot slide out. That also works if you rent and need to leave no marks. If you would rather fix it in place, screw through the plywood into at least two studs, since the board and catcher together are heavier than they look, or use heavy duty anchors rated well above the load on drywall. If there is no wall to lean on, a freestanding frame from 2x4s does the job. If the range shares its space, like a hallway, keep the setup easy to move, so you can set the range up for a session and take it down afterward.
Target Height
Set the center of the target at 1.40 m (about 55 inches) above the floor you stand on, the same height used at matches (ISSF General Technical Rules, 6.4.6.1).
Lighting
It is a good idea to make sure the target is well lit from day one; after all, you need to be able to see where you are pointing. Do not settle for ambient or dim lighting. Section 3 takes another pass at lighting and gets a bit more technical, but for now, a well-lit target is all you need.
Marking the Firing Line
Measure your 10 m from the target face, not from the wall or the plywood, since the target sits in front of both, and get the distance as close to 10 m as you reasonably can. Tape the line on the floor so it stays put between sessions, and when you shoot, stand behind the tape without touching it. In competition your feet may not touch or cross the firing line (ISSF General Technical Rules, 6.4.5.4), so it is a good habit to practice the same way.
Short on space? While 10 m is preferred, a shorter range is possible. It will require scaled-down targets sized for your distance, or an electronic scoring target (EST, covered in the appendix) that can scale the target and score shots at the shorter distance. Contact us and we will gladly discuss your options.
Firing Point and Floor
Make sure the floor where you stand is level and, preferably, solid, from the line back a meter or so (about 4 ft).
You also need a place at the firing line to rest the gun between shots and keep pellets and tools within reach. Rifle shooters use an offhand stand for this. Pistol shooters need something like a table, at around waist height (ISSF uses 0.70 to 1.00 m, roughly 28 to 39 in), set right at the line, just in front of you, within reach but clear of your stance.
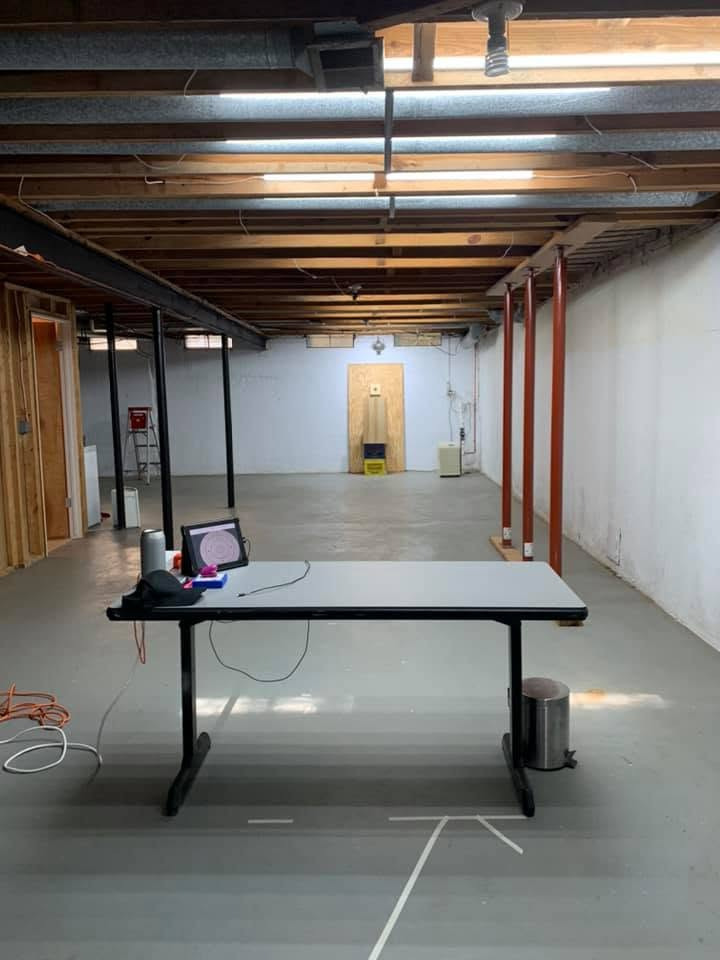
The finished range from behind the firing point: the table at the taped firing line, LED strips along the ceiling, and a spotlight over the target.
That is all a basic home range needs: a target holder with catcher, target cards, a plywood backstop, a well-lit target, and a stand or table at the firing line. Read Section 2 before your first shot.
Section 2: Range Safety
The habits that keep everyone in your house safe and lead under control, from your first shot on, so read this before you shoot.
A match air rifle or air pistol is not a toy. Regular range safety rules apply at home too, even though this is a private range and you will likely be the only one using it. These rules should become second nature no matter what or where you shoot, and internalizing safety measures starts at home. The core rules always come first: treat every gun as loaded, and keep your finger off the trigger until you are on target and ready to shoot. Those, and every other core safety rule, apply here as well. The points below are the ones that matter most for setting up and running a home range.
- Know what is behind your target: A core range safety rule, worth repeating even though you already checked your wall in Before You Start.
- Control the space: While you are shooting, nobody goes between the firing line and the target. Let the household know when the range is live, close off access, and keep kids and pets out of the room. If anyone could walk into the space between the firing line and the target, for example from a doorway along the side of the range, close that path off. Barrier tape, a rope, a locked door, or a pet gate all work; what matters is that absolutely no one, person or pet, can wander into the line of fire while you are concentrating on a shot.
- Muzzle discipline: Keep the muzzle pointed downrange at the target area at all times. Load only at the firing line, with the gun pointed at the target.
- Going downrange: Before you step past the firing line to change a target, unload the gun, open the action, insert a safety flag (open bolt indicator), and set it down on your table or stand. The same goes when you have company: nobody, friends and family included, touches a gun while anyone is downrange.
- Inspect your equipment: Check the catcher and the plywood backstop regularly. Replace a worn or damaged catcher, and replace the plywood if strays ever wear through it.
- Safe storage: When you are done, store guns unloaded and locked, with pellets kept separately and out of reach of children.
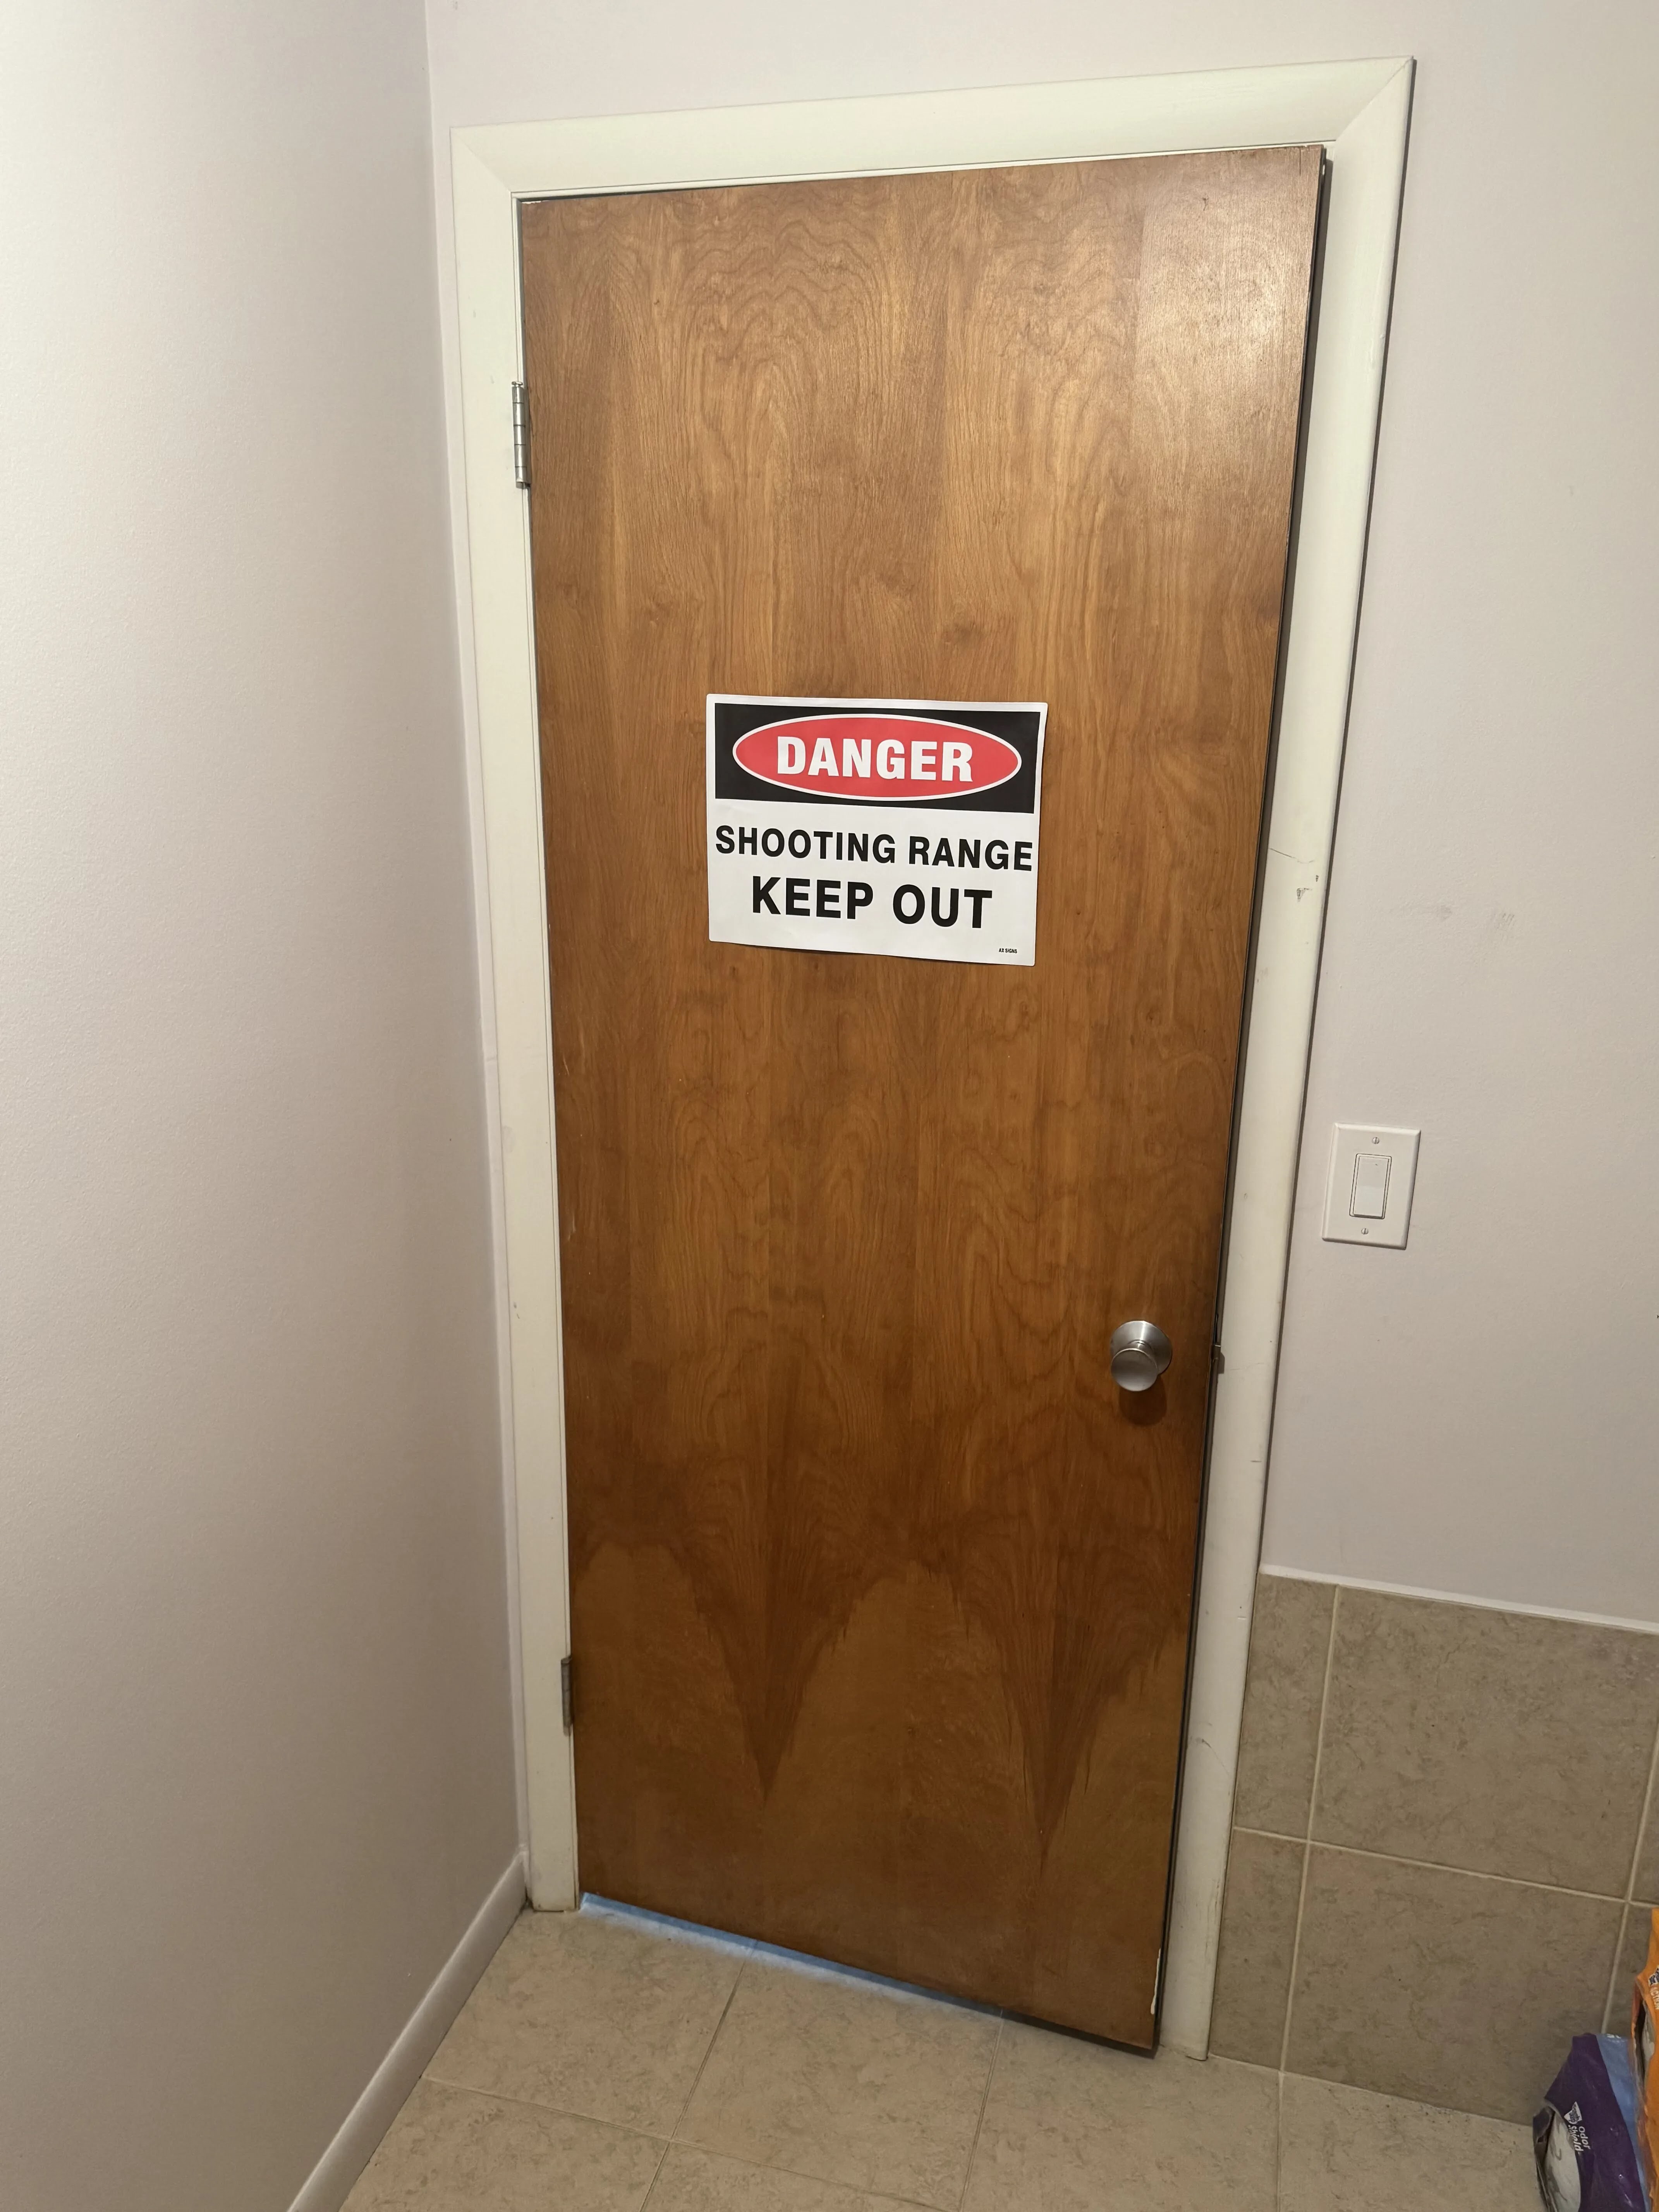
Example: With the entrance just a few feet from the middle of the range, "Do Not Cross" tape stretched across it during a session does the job. It is a bit tongue-in-cheek, but it works. A "Danger, Shooting Range, Keep Out" sign on the door makes sure anyone sees the warning before they enter the range.
Lead
Pellets are usually lead, which is toxic if it gets into your body, but the risk is low and easy to manage. Firing does not put measurable lead into the air; residue settles on the floor in front of the firing line and around the catcher. Lead-free pellets exist, but they are not yet accurate enough for target work. A few simple habits are all it takes, as long as you keep them every time.
- Hygiene: Wash your hands with soap and water after shooting or handling pellets. Do not eat or smoke on the range, and keep drinks in a closed bottle.
- Stay off the residue: Avoid stepping just in front of the firing line. Going downrange, walk along the side of the lane.
- Cleaning up: Do not dry sweep. Vacuum with a shop vacuum, then wet-mop with a mop kept only for the range.
- Emptying the catcher: Empty it before it gets full, since a full trap breaks pellets into finer fragments. Wear gloves, tip the contents into a sealed container, and leave this job to adults.
- Disposal: Recycle spent pellets through a scrap metal dealer, a bullet caster, or a local range. Bag used vacuum filters and mop heads separately.
- Children and pregnancy: Lead is riskier for children and anyone pregnant. Keep them out while you shoot, and clean up afterward.
The CDC Lead Poisoning Prevention Guidelines and the USA Shooting and CMP Guide to Lead Management for Air Gun Shooting have more detail.
Section 3: Refining the Basic Home Range
Once the basic range works, these upgrades make it feel like a real range: match-level lighting, seeing your shots without walking downrange, and a quieter range.
Lighting
ISSF sets lighting standards for indoor 10 m ranges (ISSF General Technical Rules, 6.4.14). You do not have to match them exactly at home, but they are worth working toward.
- On the target: at least 1500 lux, with 1800 lux or more recommended.
- General range lighting: at least 500 lux.
- Why the room matters too: If you only spotlight the target and leave the rest of the room dim, your eyes adjust to the dim room, not the bright target, and your sight picture ends up nothing like what you would see on a real range.
- Quality of light: Light the target evenly, without glare or distracting shadows. Keep the wall behind it a light, neutral, non-reflective color.
- Checking your setup: A borrowed or inexpensive lux meter is all you need. For the target, hold it at the target, pointed back toward the firing point. For general lighting, hold it at the firing point and again halfway to the target, pointed up at the ceiling lights.
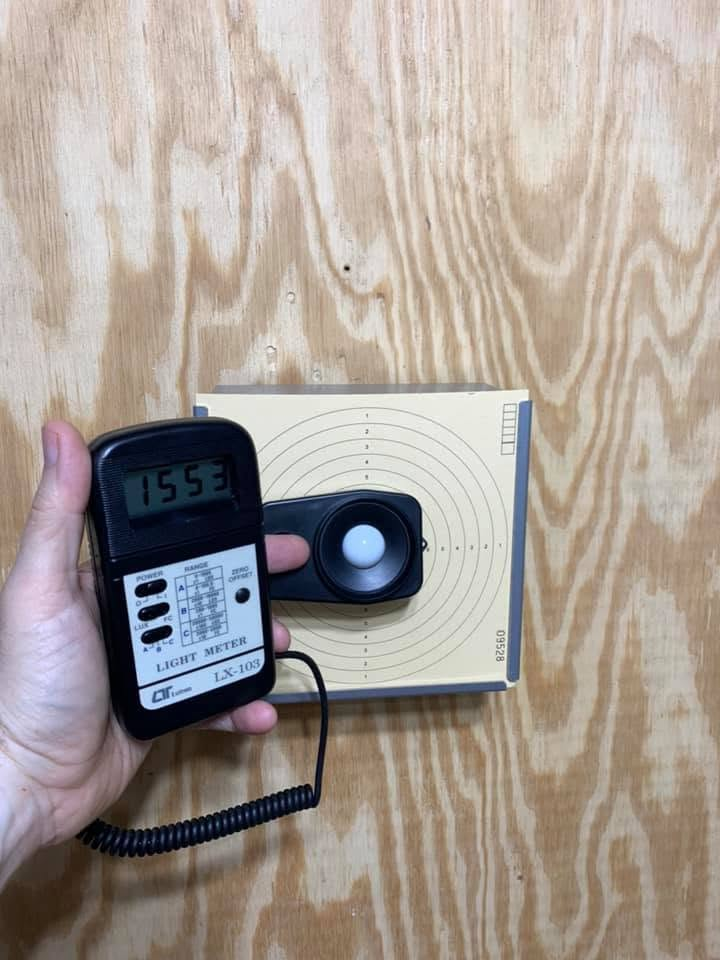
Checking the target: 1553 lux, just over the ISSF minimum of 1500.
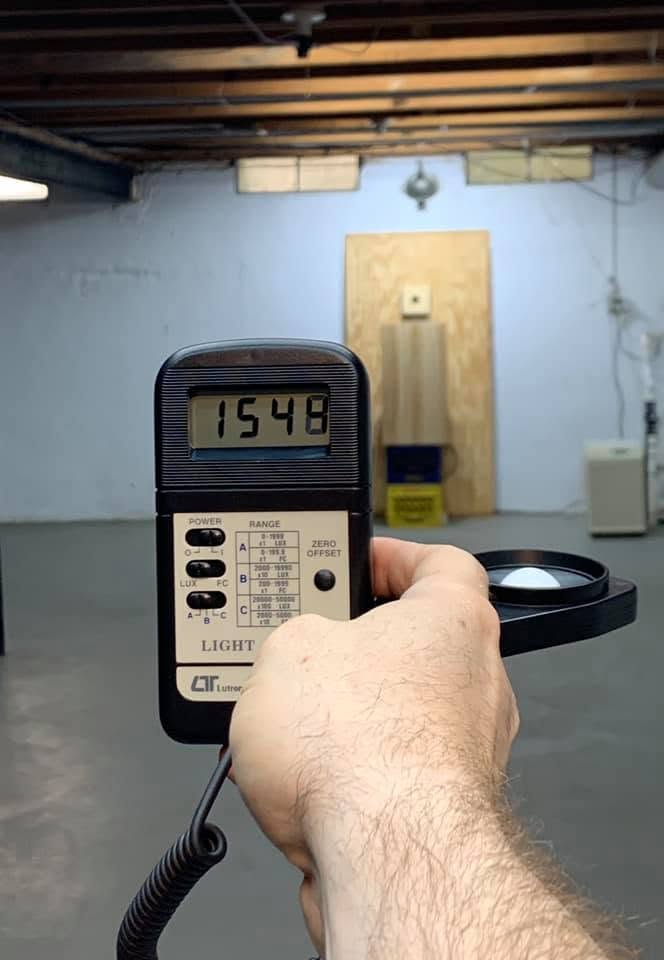
Checking the firing point: 1548 lux with the sensor pointed up at the ceiling lights. That is well above the 500 lux general minimum, and right at the roughly 1500 lux ISSF recommends on the firing line of new finals ranges (6.4.14).
Getting there: What it takes depends on your space. Most home ranges need a dedicated spotlight aimed at the target. How much general lighting to add depends on what the room already has: a bright garage may need little or nothing, while a dim basement may need more ceiling lights. A screw-in LED spotlight in an inexpensive clamp light is an easy way to light the target, with no wiring to do. Check that the clamp light's wattage rating covers the LED, and that the clamp can hold its weight, since multi-panel LED lights are heavier than a bulb.
Example: In a dim basement, a single pack of LED ceiling lights came nowhere near the ISSF numbers. Doubling the ceiling lights and adding a powerful LED spotlight in a clamp light clipped to an exposed rafter got the target to just over the 1500 lux ISSF minimum, with about the same at the firing point.
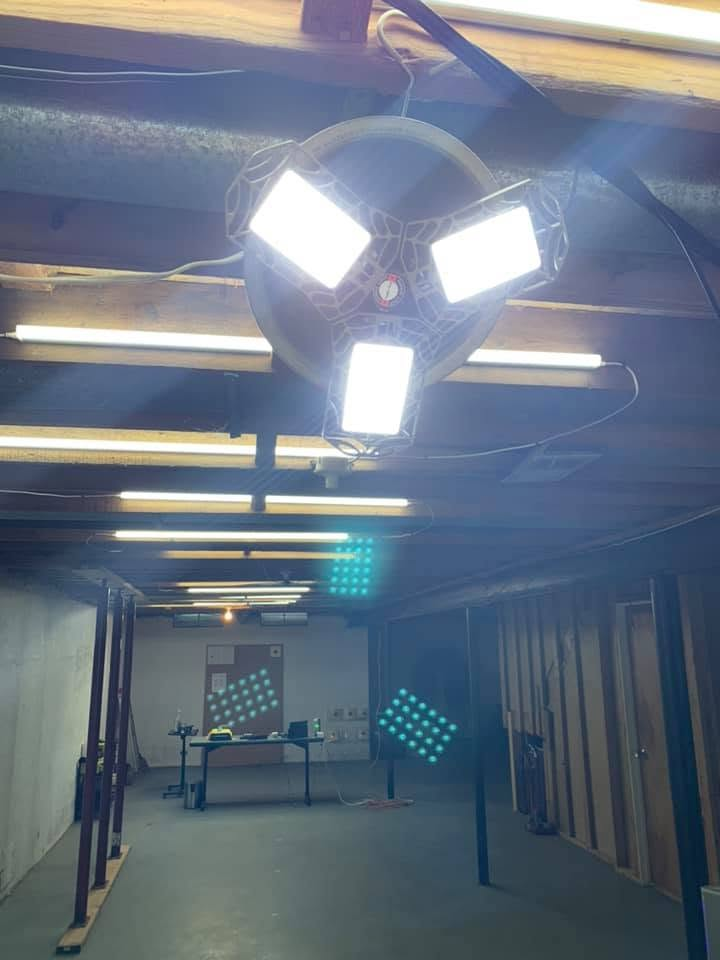
The target spotlight mounted to the rafters just in front of the target and aimed straight at it, with LED strips running the length of the ceiling back to the firing line.
Spotting Scope
From 10 m you cannot see most pellet holes with the naked eye, so without some way to see your shots you end up walking downrange every few shots. A spotting scope is the traditional fix. All it needs from your range design is a spot at the firing point, on your table or a small stand beside you, positioned so you can look through it without changing your position or stepping away from the line. The phone camera setup below does the same job with gear you probably already have. Seeing your shots matters even more for rifle, where the 10-ring is a dot smaller than a pellet hole.
Remote Monitoring
You can see your shots from the firing line for free, using old devices you probably have lying around. An old smartphone becomes the camera, and a tablet, laptop, or another phone at the firing point becomes the monitor. Put a free IP camera app on the camera phone. It streams over your home Wi-Fi to a local address, with no internet connection needed, and you open that address in a browser on the monitor. Nothing needs to be installed on the monitor, and once it is set up, starting a session takes a couple of taps.
Example: The setup shown here uses an old Android phone that had been sitting in a drawer as the camera, an antique iPad 2 as the monitor, and the free version of the IP Webcam app. That is all it takes.
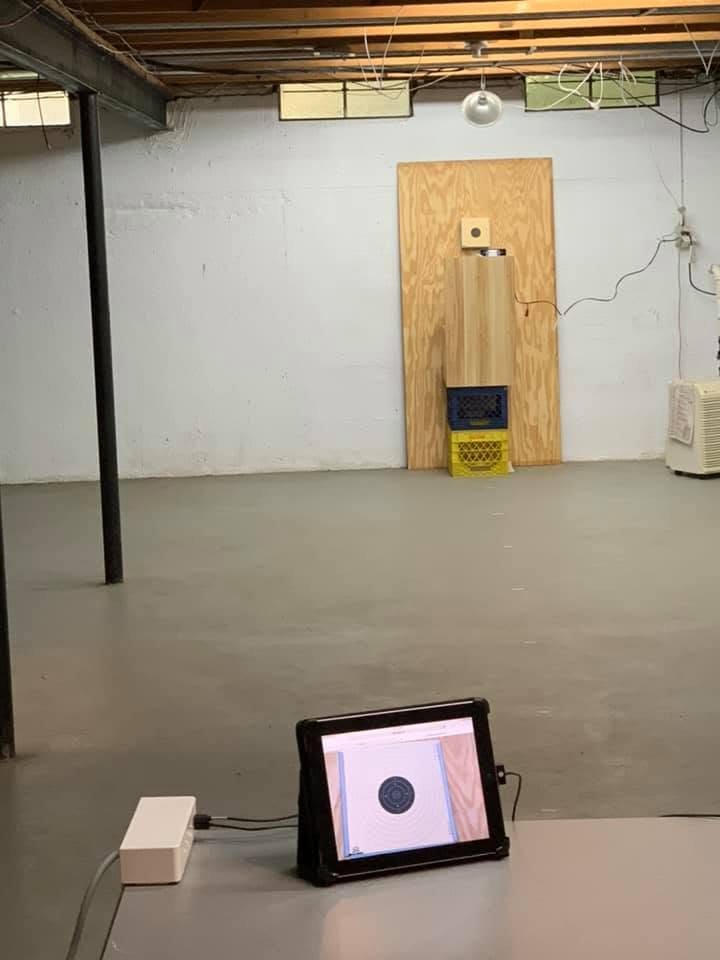
From the firing point: the tablet shows the live feed, while the phone sits hidden behind the panel below the target.
Placing the phone: A small tabletop phone stand set just below the target works well, angled up so the camera looks straight at the target face. Put something solid between the phone and the firing line, a scrap of plywood or even an old piece of furniture, so a low shot cannot reach it.
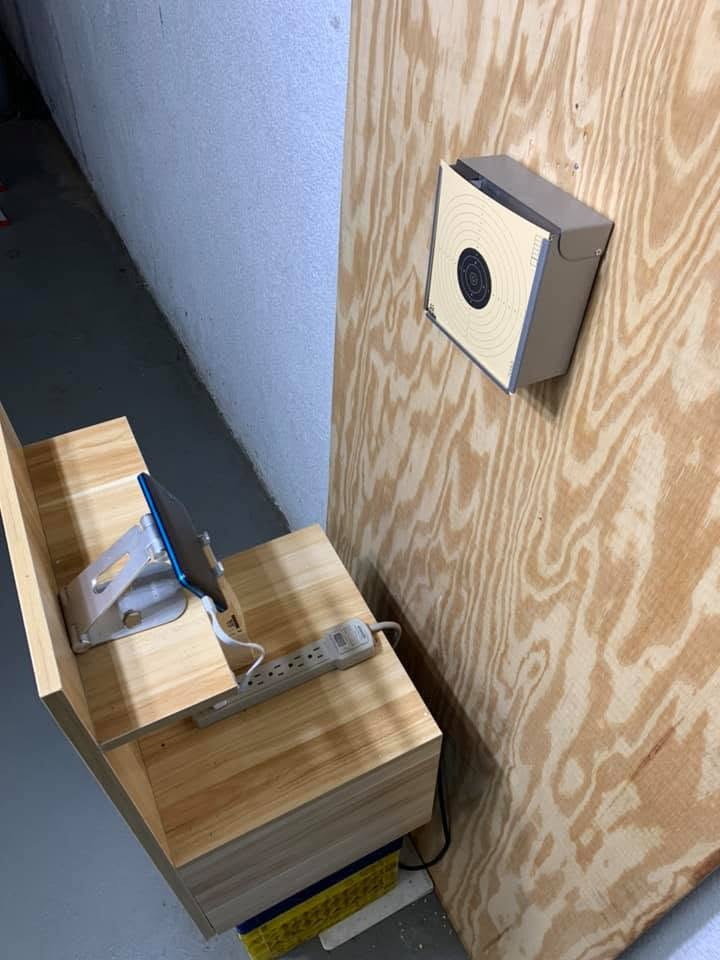
Target side, final setup: the phone on its stand behind the panel, plugged in so it can run through a whole session.
Seeing the holes: Zoom the view in on the scoring rings, and if your app offers a negative (inverted color) effect, try it. The black turns white, and pellet holes in it show up far more clearly. On a rifle card with several bullseyes, zoom in on the one you are shooting, and move the view as you go to the next.
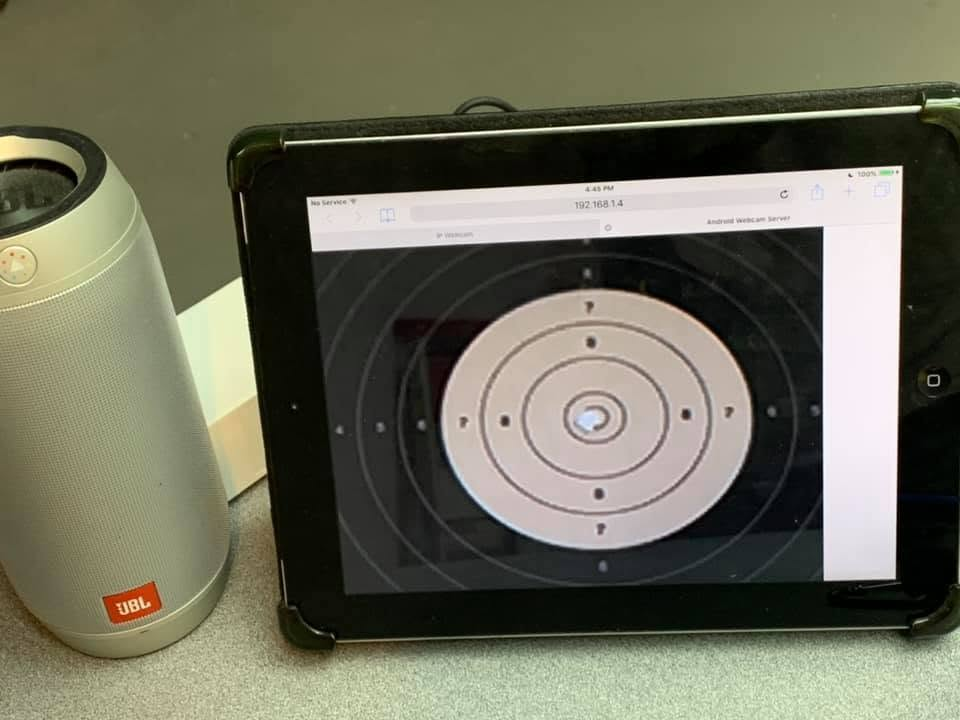
The monitor in action, zoomed in with the negative view: every hole in the black stands out.
Keeping it running: Keep both devices plugged in, and turn off sleep or auto-lock on each, so the stream does not drop in the middle of a session.
Watching from elsewhere: Any device on your home network with a browser can open the stream, whether it is a TV, a phone, or a computer, even in another room. That is handy if a coach or family member wants to watch. Your browser may flag the address as "Not secure"; that is normal for a local address on your own network. If you want to keep others on your Wi-Fi out, most IP camera apps let you set a password.
Noise Mitigation
A pellet hitting a steel catcher is nothing like a gunshot, but the sound still carries around the house. Hearing protection is a good idea anyway, both for safety and because it cuts out distractions, which helps your focus and shot execution. For most households, none of the options below is necessary. If you share a wall with a neighbor, or have family or pets who are bothered by the sound, these are the options other shooters have used:
- Isolate the backstop: Mount the plywood on rubber pads instead of directly against the wall.
- Dampen the catcher: Only worth it if noise is a real problem for you. Plumber's putty or strips of old carpet inside the catcher soften the impact, but the pellets then get caught in the putty or carpet instead of dropping to the bottom of the catcher for easy cleanup. Cleaning them out is a headache, and the putty needs replacing fairly soon. A piece of heavy rubber (a scrap of horse stall mat works) or dense carpet hung over the plywood around the catcher also quiets the occasional stray, and keeps the board from splintering.
- Enclose the target: Line a cardboard enclosure around the catcher with acoustic or egg-crate foam.
- Use a soft trap: Pack a box with rags or layered cardboard instead of relying on steel.
- Try rubber mulch: A box filled with rubber mulch (shredded tire chips, cheap at hardware and big-box stores) is quiet, though sorting the pellets back out takes some work. Dumping it in a bucket of water helps, since the rubber floats and the lead sinks.
- Soften the wall: Hang moving blankets from a curtain rod along a shared wall, so they can come down when not needed.
Section 4: Filling Your Cylinder at Home
You do not need air at home to start shooting, but when you want the convenience, this section helps you choose between a scuba tank, a hand pump, and a compressor.
Not every airgun needs this. Many junior sporter rifles run on carbon dioxide (CO2) cartridges or have a built-in pump lever, so if yours does, you can skip this section.
If you can fill your cylinder at your club or range, you can bring it home and shoot. Still, having air on hand at home is a big convenience, and once your basic setup is running it is one of the most worthwhile upgrades.
The Scuba Tank Option
Verdict: our most recommended option for home ranges. Expect to spend a couple hundred dollars up front. The tank does not have to be new as long as it is certified to hold high pressure. Refills at a local scuba shop are cheap and infrequent, maybe once a year. Have the tank inspected regularly. In the US, that typically means a visual inspection every year and a hydrostatic test every 5 years, and most dive shops will not fill a tank that is out of date.
Matching the fittings: Competition airguns come with a metric DIN fill adapter, a separate part rather than something attached to the cylinder. That is not necessarily the fitting on a scuba tank or compressor; many scuba tanks in the US come with a yoke valve rather than a DIN valve. Check before you buy. If the tank has a DIN valve, the adapter can screw straight into it; if not, a dive shop can install a DIN valve or provide an adapter.
Example: The fill adapter that came with the pistol stays screwed into the tank's DIN valve at home, and comes out only for travel to matches or when someone with a different gun needs to fill.
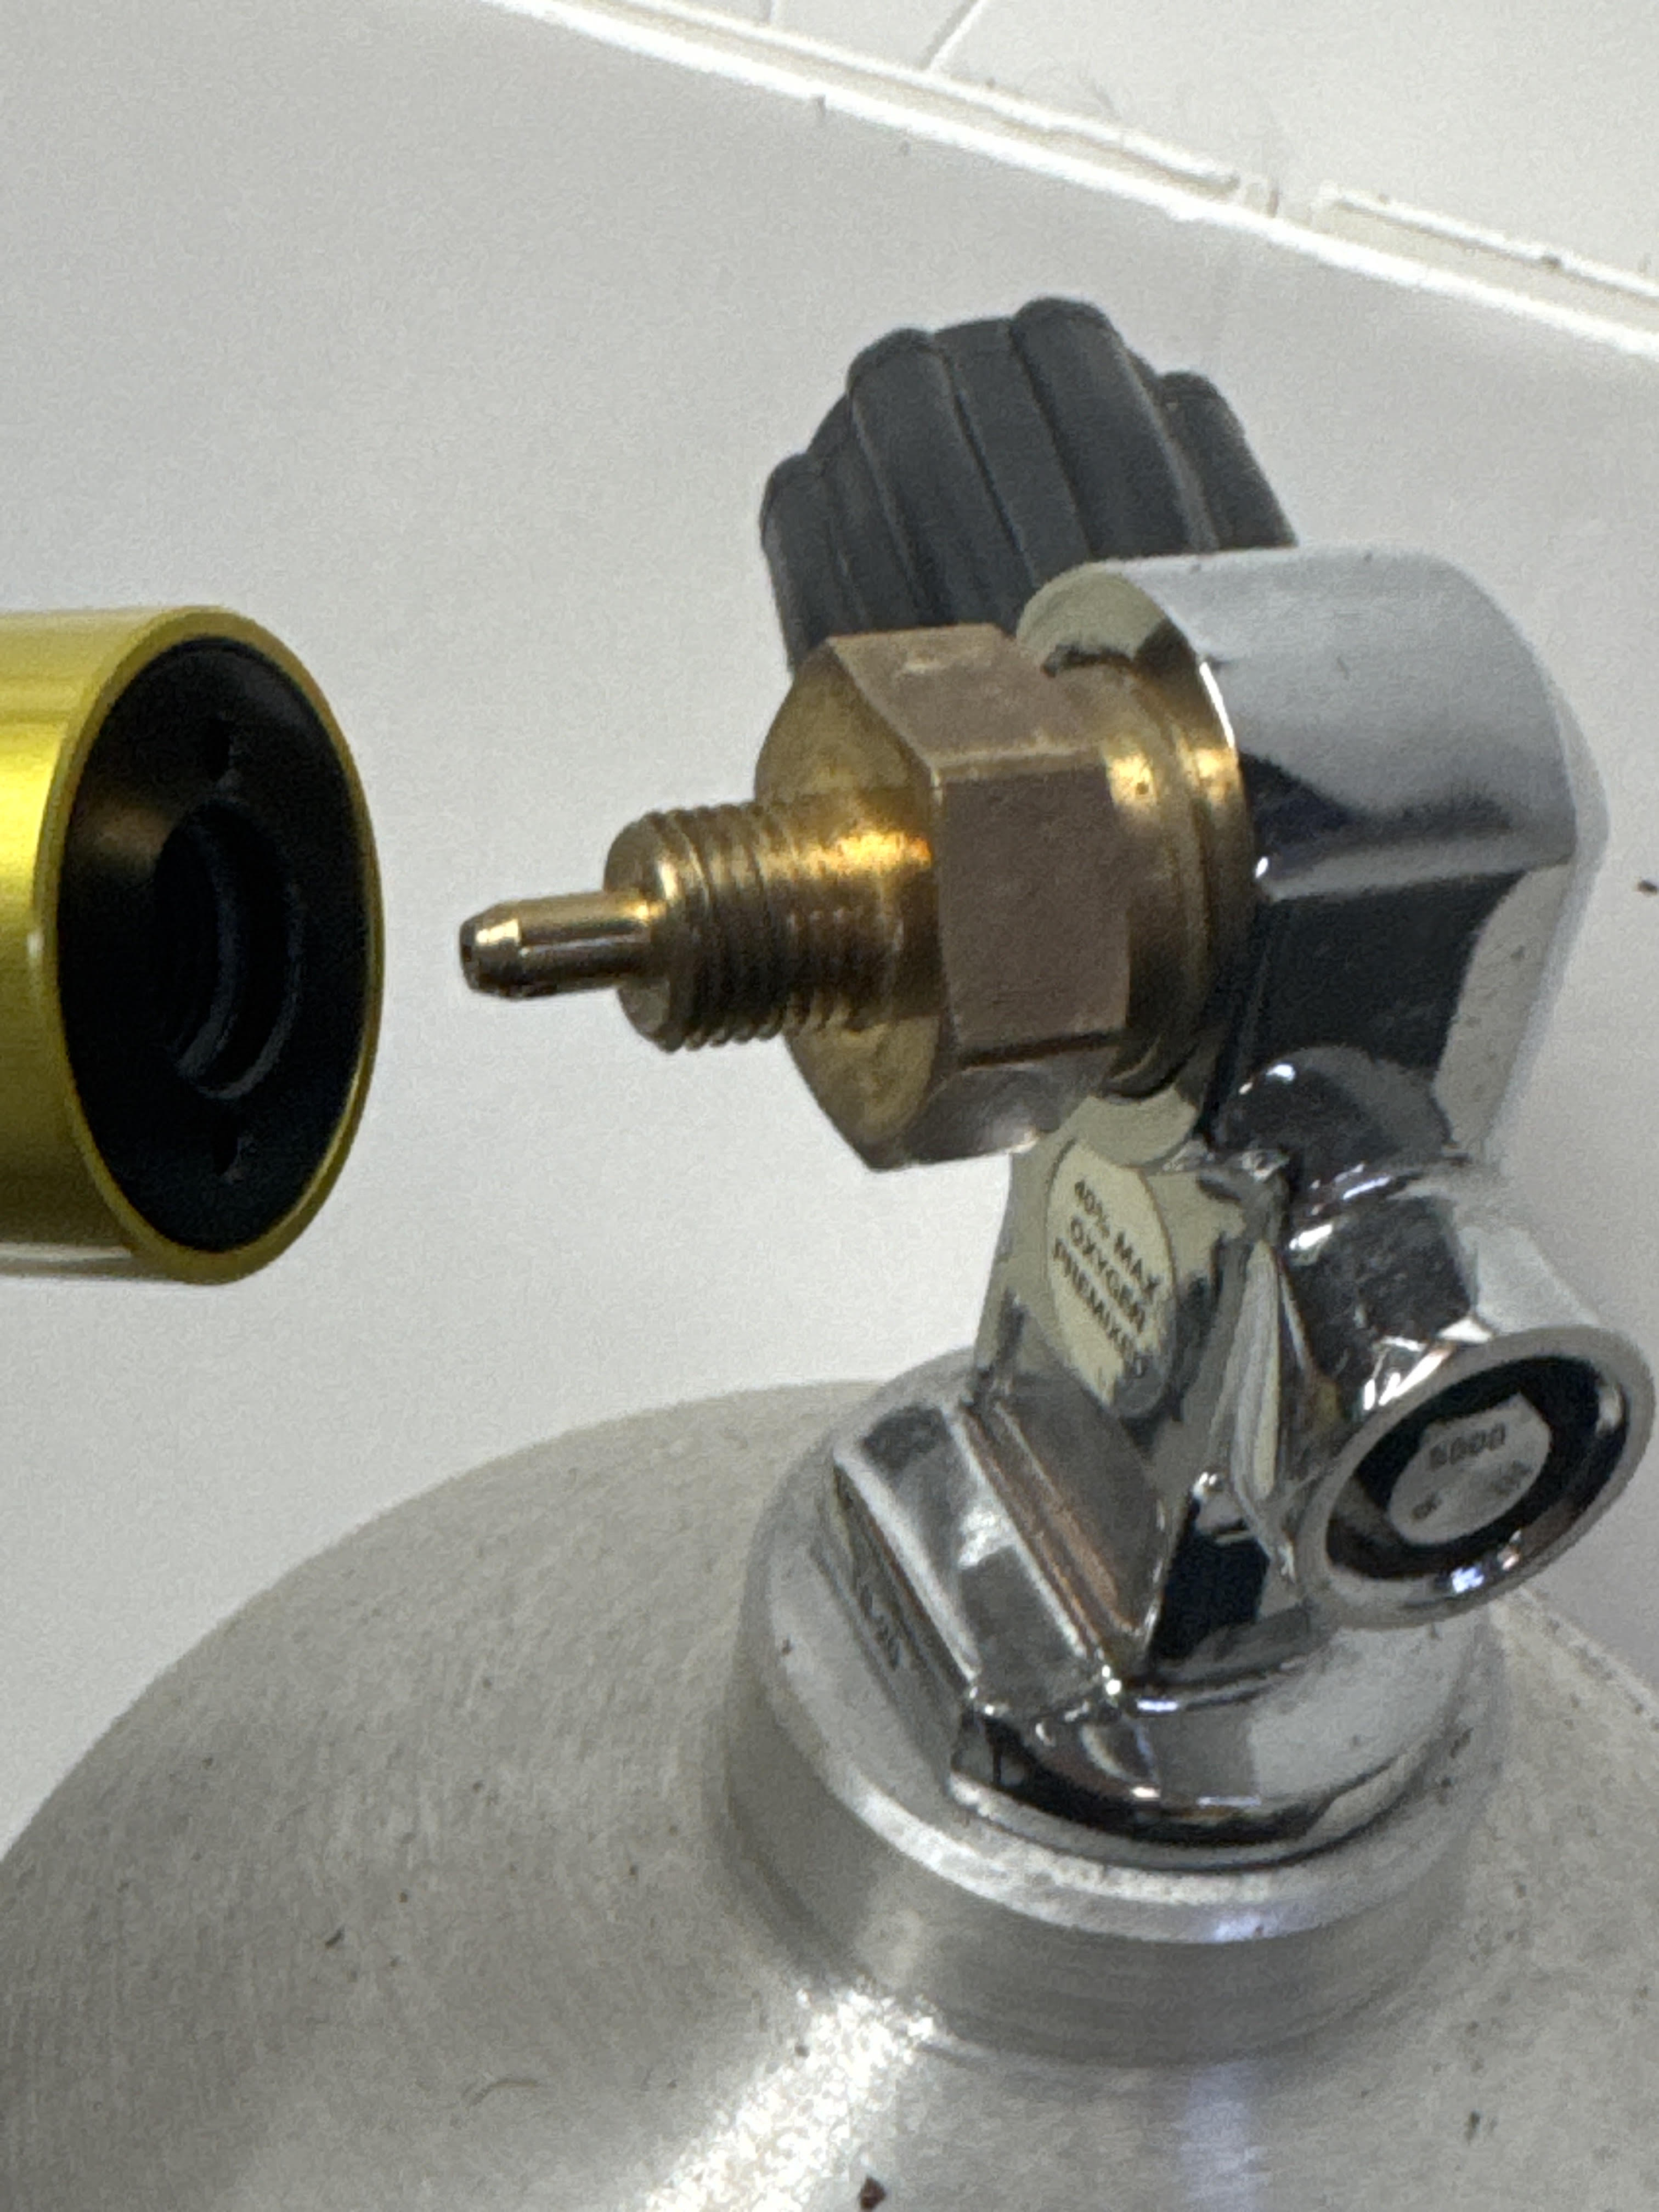
At home: the fill adapter that came with the pistol stays in the tank's DIN valve, and the cylinder threads straight onto it.
Secure the tank: It is a good idea to secure the tank to a wall or other solid structure so it cannot tip over. ISSF requires this for the air supply at official 10 m ranges (ISSF General Technical Rules, 6.4.2).
A note on pressure: A standard aluminum 80 cubic foot scuba tank is rated for 3000 psi (207 bar). It can only fill your gun up to its own pressure, and that drops a little with every fill. In practice this rarely matters. Most match air rifles and air pistols run at 200 bar, and their cylinders are small, so even a partly used tank gives you enough air for a full match. If your gun takes 300 bar fills and you want to use them, you will need a 300 bar (around 4500 psi) carbon fiber tank instead. The CMP Guide to Compressed Air Usage has more detail.
The Hand Pump Option
Verdict: no refill costs, but a lot of physical work. A hand pump costs less than a tank setup, though it still runs over a hundred dollars. Pumps built for competition guns can reach the 200 bar most match air rifles and air pistols use. Getting there takes a lot of pumping, and that physical effort is a real hit to convenience.
The Compressor Option
Verdict: rarely worth it if you are only filling for yourself. A workshop compressor cannot fill a match airgun. Reaching 200 to 300 bar (roughly 3000 to 4500 psi) takes a dedicated high-pressure compressor built for PCP airguns or scuba tanks, not the low-pressure kind used for tools and tires. They cost far more than a scuba tank. If you already own one, you will likely need an adapter for European DIN-type connections, and it usually lives somewhere other than the range, like a garage or workshop.
Appendix: Upgrades to Consider
Optional builds for when you are shooting regularly and getting serious about competing. If you are just starting out, you can skip this for now.
Once your basic range is ready, the more you shoot, the more excited and serious about it you may get, until you find yourself wanting to compete (see our competition guide [LINK PLACEHOLDER: public URL for the ISSF competition guide, once published]). At that point, you will definitely benefit from training in an environment as close as possible to a competition hall: lit electronic targets, for example, or shooting next to other people so you learn to keep your focus with distractions around. The upgrades below move from handling the target, to match-like targets, to a match-like environment. A short note for three-position rifle shooters closes the appendix.
Handling the Target
Target Stand (about $60 to $100)
A step up from a fixed wall mount is putting the target on a stand. A TV tripod is a good, sturdy stationary option at about $60, and a rolling TV stand, closer to $100, makes the target easy to maneuver. Either works for a simple paper target holder or an EST, and with an adjustable mount it is easy to set the target height. A rolling stand lets you move the whole target out of the way when the space is needed for something else; lock the wheels before you shoot. Whichever you choose, make sure it is sturdy enough not to tip, and keep a backstop panel mounted on the stand behind the target so strays are still caught.
Motorized Target Retrieval (about $450 to $500)
A pulley-driven target carrier sends the target out and brings it back at the push of a button, so you are not walking downrange. These systems (Gehmann's electric carrier is a common example) work with a normal pellet trap and only handle the target card. They need a solid, heavy bench or stand, because the motor pulls against the line's tension to bring the target back, and a light stand just gets dragged. For most home ranges a standard target holder is still the simpler, more reliable choice. A carrier is nice if you specifically want less walking between shots, but you do not need one to train well.
Match-Like Targets
Backlit Target Box (about $25)
A step short of an Electronic Scoring Target (EST, covered later in this appendix), you can build a box with a cut-out for your target and run LED strips around the inside, so the target lights up much like an electronic target does at a match. Most of the cost is a dimmable LED strip.
Keep it safe to shoot at: Your pellet catcher still sits behind the target inside the box, but the LED strip is the weak spot. A shot outside the cut-out can go through the box and sever the strip. Build the box from plywood, or mount the strip on thin wooden planks glued to the inside of the cut-out, so a stray shot cannot reach the LEDs.
Example: A first box built from a shipping carton cost about $25, almost all of it for the LED strip. It worked great until a few guests shot outside the cut-out, straight through the cardboard, and severed the strip, which killed the light. That is why plywood is the better choice.
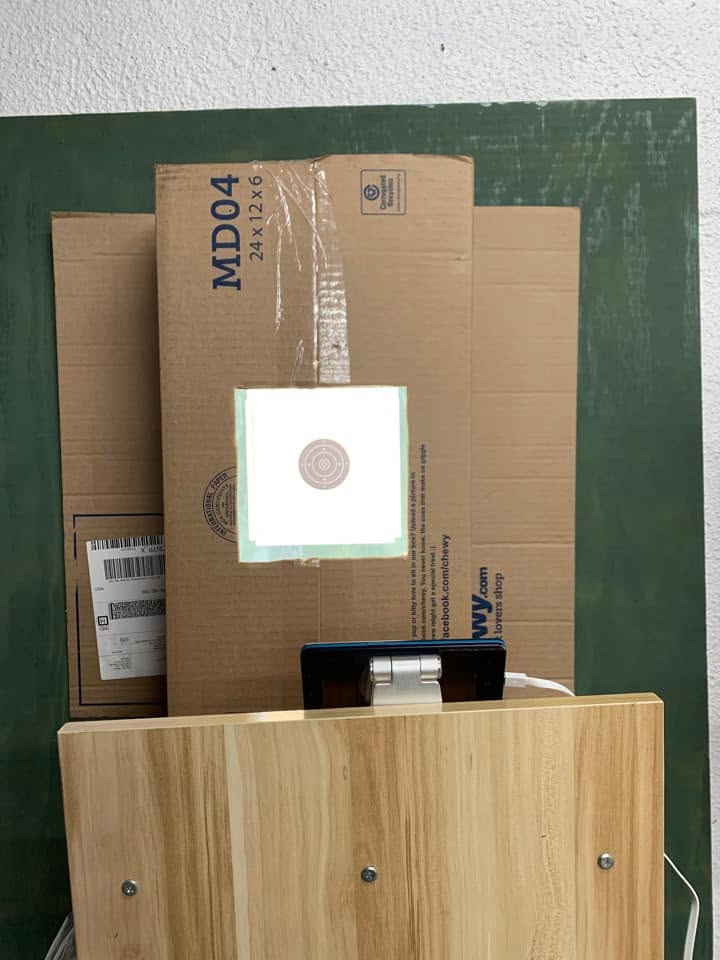
An early backlit box built from a shipping carton, tried out before buying an EST. For regular use, plywood holds up much better.
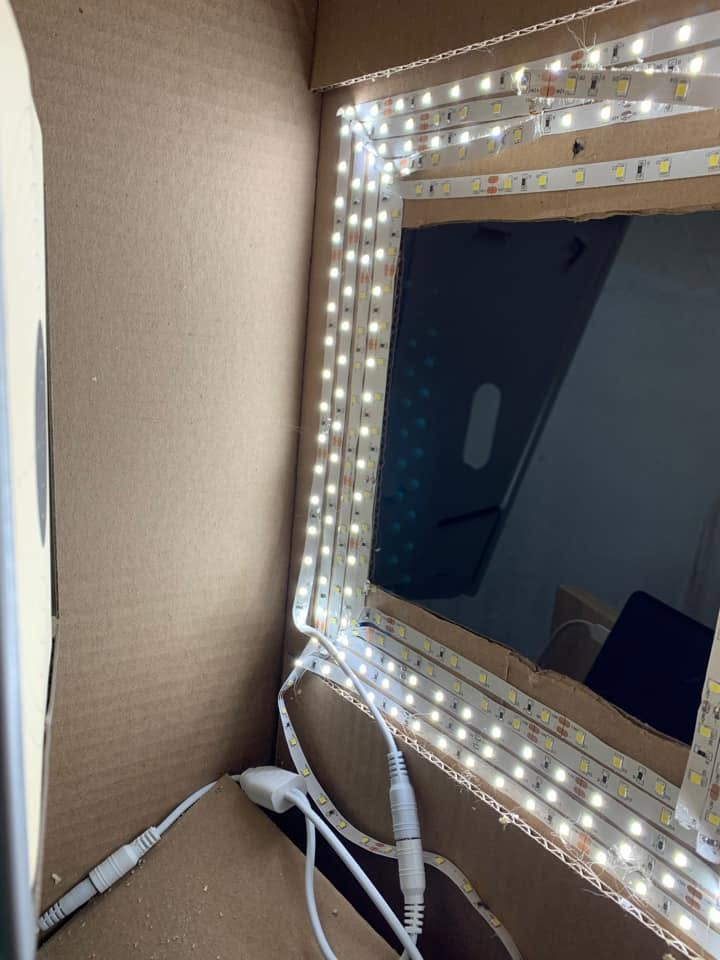
Inside the prototype: several runs of LED strip around the inside of the cut-out. This is the spot a stray shot can reach, which is why plywood, or wooden planks behind the strips, is worth it.
Matching the look: Model the size of the lit face, the LED color temperature, and the brightness (a dimmable strip makes this easy) on one EST manufacturer's targets. If you find yourself going to great lengths to match one exactly, that is usually a sign to look at a real EST instead.
Electronic Scoring Targets (a few hundred dollars to about $4,500)
When you are ready, and if the budget allows, an EST is the next step. It replaces your target holder with an electronic scoring unit, and every shot shows up instantly on a monitor at your firing point, so you never have to go downrange to see where you hit. It also does away with a spotting scope, a separate remote viewing setup, and extra target lighting, since the unit lights itself. It is as close to match equipment as a home range gets, and for the range in this guide it has been well worth the investment. Prices range from a few hundred dollars for a DIY system to about $4,500 at the top end, depending on features, technology, precision, and ISSF certification. Not all targets are created equal, and scoring a shot is only where their functionality starts; choosing one is a topic of its own.
Match-Like Environment
Multiple Lanes (roughly the cost of another basic lane)
Once one lane is working well, adding a second or third lets you shoot alongside other people, which brings you closer to the competition experience. Invite other shooters over for a mock match, and you get some of the pressure and distraction of shooting next to others on match day. Setting it up mostly comes down to width. Each shooter needs room to stand in position without crowding the next. ISSF uses at least 1 m (about 3 ft) per firing point; at home, 1.5 m (5 ft) per lane is more comfortable. Keep all the targets at the same height, each one centered on its own lane. Each lane just needs its target mounted on a backstop, and one continuous sheet across all the lanes or a separate board for each both work, so use whatever you have. Plan lighting for the full width, since one fixture aimed at one target leaves the others dim. Mark every lane's firing line at the same 10 m.
Example: Two leftover pieces of plywood serve as the backstops, simply because that is what was on hand, and an Electronic Scoring Target was added later between the two paper lanes.
[INSERT PHOTO 14: 13-appendix-range-today-three-lanes.png]
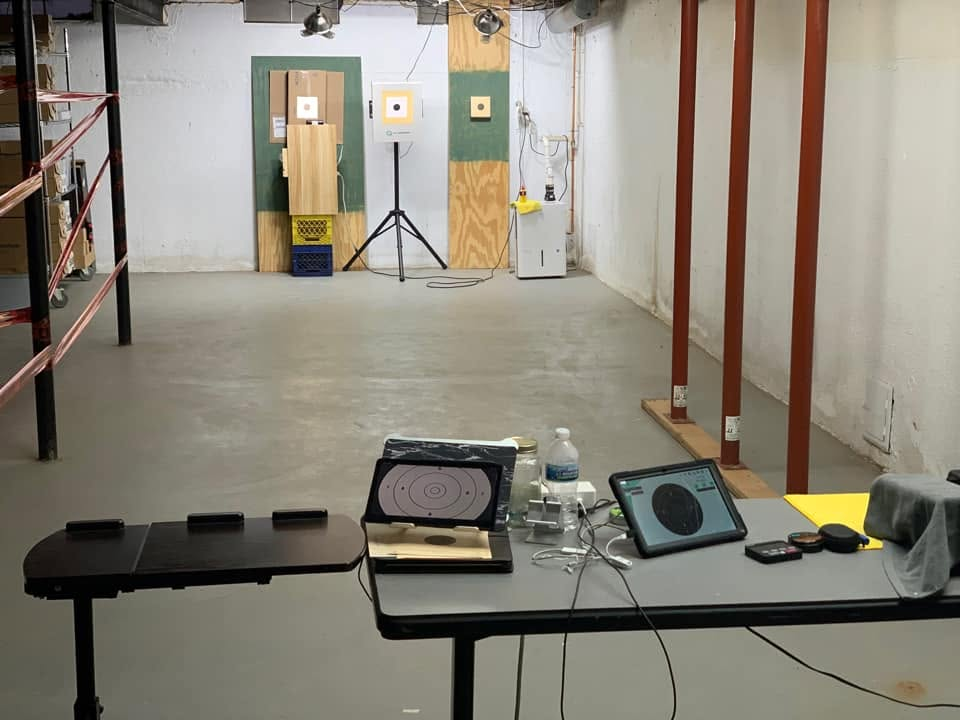
The range today: two paper target lanes with an electronic scoring target (a SportQuantum SQ10) between them. The EST has its own monitor, one paper lane is watched through the phone camera setup, and the other through a spotting scope.
Three-Position Air Rifle
This guide is built around standing, the only position in the ISSF 10 m rifle event. If you shoot three-position air rifle (prone, kneeling, and standing), as many US youth programs do under CMP rules, your range needs a few more things: a sturdier pellet trap, or a target holder made for the 12-bull card if you shoot one; more floor space behind the firing line for a prone mat; and a way to change the target height for each position.
Cost Summary
Everything in this guide, priced out in one place.
Basic home range: $50 to $150, depending on what you can upcycle (backstop, lighting) versus buy new. Paper targets are the one must-buy item, at about $7 to $10 per 100. If you follow our recommendation and use a metal target holder with a pellet catcher, add about $20 to $30 for the holder.
Example: The basic build shown in this guide came to $133: a box pellet trap ($22), two packs of LED ceiling lights ($92), and an LED spotlight over the target ($19, half of a $37 two-pack). The camera (an old phone), the monitor (an old iPad 2), and the streaming app (IP Webcam, free version) cost nothing. Lighting was by far the biggest expense.
Beyond the basic setup:
- Air filling solution: A scuba tank setup runs a couple hundred dollars up front, then cheap, infrequent refills. A hand pump costs over $100 with no refill costs. A dedicated high-pressure compressor is a much bigger investment and rarely worth it just for yourself.
- Remote monitoring: Free if you use old devices you already own.
- Upgrades (Appendix): A target stand runs about $60 for a TV tripod, or closer to $100 for a rolling TV stand. A motorized target carrier runs about $450 to $500. A backlit target box runs about $25, mostly for a dimmable LED strip. Electronic Scoring Targets range from a few hundred dollars for a DIY system to about $4,500 at the top end, and choosing one is a topic of its own.
Help Us Keep This Guide Current
We keep this guide up to date, and we would appreciate your help with that. If you spot anything worthwhile that we missed, an error, or a change to the regulations or to anything else we reference, please contact us at sportshootingdepot.com/contact-us. Every note helps us keep the guide accurate and current.
Disclaimer
This guide shares what has worked for us and for other shooters. It is not legal or professional advice. You are responsible for following the laws and rules where you live, and for setting up and using your range safely.
References
- ISSF Rule Book, Edition 2025 (Second Print 07/2026), effective 1 July 2026, General Technical Rules. Rules 6.4.2 (range facilities and air supply), 6.4.5.4 (firing line), 6.4.6.1 (target height), and 6.4.14 (target and range lighting).
- CMP Air Rifle and Air Pistol Competition Rules, 5th Edition (2026), effective 1 March 2026.
- CMP Guide to Compressed Air Usage.
- CDC Lead Poisoning Prevention Guidelines.
- USA Shooting and Civilian Marksmanship Program, Guide to Lead Management for Air Gun Shooting (2017).